What is Pixel and Pixel Size how it affects Resolution?
A pixel, is the smallest unit of a digital image or display. In a digital camera sensor like a CCD or CMOS, each pixel is a photosite—an area that collects light (photons) and converts them into an electric charge which is then transformed into a digital value.
Each pixel can only record one value, so color images are typically produced using a Bayer filter, which overlays the sensor array with a pattern of red, green, and blue filters. Each pixel records only one color of light, but the camera's image processor interpolates this data to produce a full-color image.
Image Resolution:
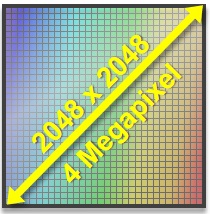
The resolution of a digital image is the total number of pixels it contains, typically expressed as a width by height value. For instance, a camera with a resolution of 1920x1080 has 1920 pixels horizontally and 1080 pixels vertically, totaling resolution approximately 2.07 million pixels
A sensor with more photosites (pixel) will capture more detail, resulting in a higher resolution image. The resolution also affects the size of the individual pixels. In general, a higher-resolution sensor of the same size will have smaller pixels, as more of them must fit into the same area.
Three main differences between small and big pixel size
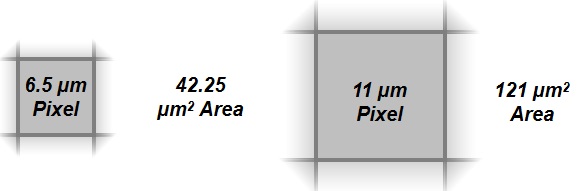
1. Light Sensitivity: Larger pixels can gather more light than smaller ones because they have a larger surface area. Think of pixels as buckets catching rain. The larger the bucket (pixel), the more rain (light) it can catch. Therefore, cameras with larger pixels tend to perform better in low-light situations because they can gather more light. This is why many professional-grade cameras have larger pixels and hence better low-light performance.
2. Dynamic Range: The dynamic range is the span from the lightest to the darkest a camera can capture in a single image. Larger pixels typically provide a larger dynamic range because they can hold a higher maximum charge before saturating (the "well depth"). As a result, they can handle a wider range of light intensities, which can be beneficial in high-contrast situations.
3. Noise Levels: When pixels are smaller, the signal-to-noise ratio can be lower, leading to noisier images, particularly in low light. This is because each pixel receives less light, and the camera needs to amplify the signal, which can also amplify the noise.
However, one advantage of having smaller pixels is that you can have more of them on a sensor of the same size, thereby increasing the resolution of the camera. This can capture more detail and provide sharper images, which can be particularly beneficial for large prints or heavy cropping.
In conclusion, there are trade-offs between small and large pixel sizes. For example, for low-light photography or when a large dynamic range is needed, a camera with larger pixels would typically be a better choice. For situations where very high resolution is necessary, such as detailed landscapes, a camera with smaller pixels and higher resolution might be preferred.
It's important to note that more pixels don't always mean a better image. Other factors such as the quality of the lens, the sensor's size, and the image processing can significantly affect the quality of the final image.
What is Well Depth and how it affects image quality?
"Full Well Depth" is typically measured in electrons (e-), it refers to the maximum charge an individual pixel in a camera sensor (like a CCD or CMOS sensor) can hold before it saturates, i.e., reaches its maximum value. This value is important because it determines the sensor's dynamic range—the range from the darkest to the brightest tones the sensor can capture.
In simple terms, a pixel on a digital camera sensor is like a small bucket that collects photons (light particles). When more light hits the sensor, more photons fill these "buckets." The size of these buckets (pixels) dictates how many photons they can hold before they become full—that's the "well depth."

If the well depth is large, the pixel can hold more photons, which means it can handle a greater range of light intensities. This is beneficial in high contrast situations, allowing the sensor to capture detail in both highlights and shadows. A larger well depth often correlates with a higher dynamic range and can give the image more tonal detail.
On the other hand, if the well depth is small, the pixel fills up quickly, causing it to clip or saturate. This usually leads to a loss of detail in bright areas of the image, a problem often referred to as "blown-out highlights."
What is FSI and BSI and their difference?
FSI and BSI refer to two types of sensor designs used in digital cameras: Front-Side Illumination (FSI) and Back-Side Illumination (BSI).
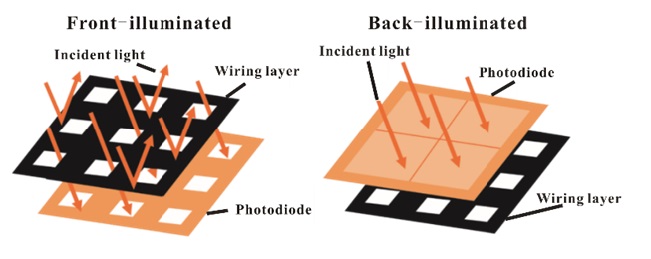
Front-Side Illumination (FSI) (Cheaper)
FSI is the traditional sensor design where the light has to pass through the wiring layer (the metal wiring that connects and powers the pixel components) before reaching the photodiode, the part of the sensor that actually captures the light and turns it into an electronic signal.
One disadvantage of FSI design is that the wiring layer can block some of the light from reaching the photodiode, especially when the pixel size is very small. This can result in reduced light sensitivity and a higher chance of lens shading issues where the pixels towards the edges of the sensor receive less light because of the angle at which light strikes the sensor.
Back-Side Illumination (BSI) (More Expensive)
In a BSI sensor, the positions of the photodiode and the wiring layer are reversed. The photodiode is placed closer to the lens, while the wiring layer is at the back of the sensor.
This design allows more light to reach the photodiode because the light doesn't have to pass through the wiring layer. As a result, BSI sensors can offer better light sensitivity and less lens shading issues compared to FSI sensors. This is especially beneficial in situations where the light is limited or for sensors with small pixel sizes.
What is Quantum Efficiency (QE) in image sensor and why it is important ?
QE stands for Quantum Efficiency in the context of imaging sensors, such as those in digital cameras. It is a measure of a sensor's ability to convert incoming photons into electrons, which can then be recorded and processed to create an image.
Quantum Efficiency is typically expressed as a percentage. A QE of 100% means that for every photon that strikes the sensor, one electron is generated. In practice, no sensor achieves 100% QE due to various losses that occur within the sensor.
Quantum Efficiency is important for several reasons:
1. Light Sensitivity: A sensor with a higher QE will be more sensitive to light, which can be especially beneficial in low-light conditions. It can capture more detail with less light.
2. Image Noise: A higher QE reduces the need for amplification to achieve a usable signal, which can help to reduce image noise. Noise is the grainy appearance you often see in low-light photographs.
3. Dynamic Range: A higher QE can also contribute to a larger dynamic range, which is the range of light intensities from shadows to highlights that a sensor can capture without losing detail.
4. Color Accuracy: QE can vary for different colors (wavelengths) of light, which can affect the color accuracy of the sensor. A sensor with high QE for all colors will produce more accurate and vibrant images.
What are the Key Factors that affect Quantum Efficiency (QE)?
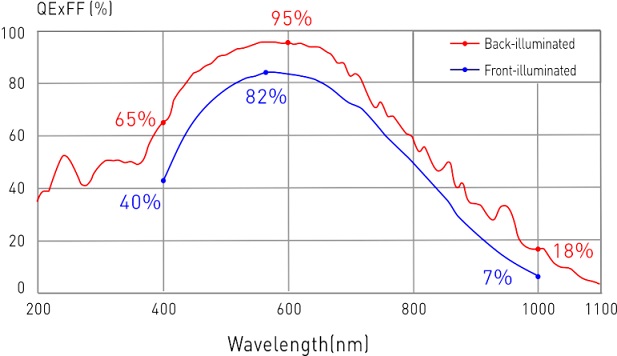
Quantum Efficiency (QE) of a sensor, which is its ability to convert incoming photons into electrons, in a CCD or CMOS camera QE chart usually looks like this
Quantum Efficiency (QE) can be influenced by below factors:
1. Sensor Material: Different sensor materials have different inherent abilities to convert photons into electrons.
2. Sensor Architecture: The design of the sensor can have a major impact on QE. For instance, Back-Side Illuminated (BSI) sensors, which place the photodiode above the wiring layer, can achieve a higher QE than Front-Side Illuminated (FSI) sensors because more light can reach the photodiode.
3. Pixel Size: Larger pixels can gather more light, which can lead to a higher QE. However, this must be balanced against the desire for higher resolution, which requires more, smaller pixels.
4. Lens Quality: The quality of the camera's lens can also affect QE. A high-quality lens that accurately focuses light onto the sensor will result in a higher QE
5. Anti-Reflective Coatings: Anti-reflective coatings on the sensor can improve QE by reducing the amount of light that is reflected away from the sensor.
6. Color Filters: Color filters that are part of most color imaging sensors can affect QE. While color filters can reduce QE because they block certain wavelengths of light, microlenses can improve QE by focusing more light onto the photodiode.
7. Thermal Noise: The temperature of the sensor can influence QE. At higher temperatures, thermal noise increases, which can decrease the effective QE. That's why some high-end cameras use cooling systems to keep the sensor at a low temperature.
8. Wavelength of Light: QE varies with the wavelength of the incoming light. Sensors are often more efficient at converting light of certain colors (wavelengths) into electrons, and less efficient for others. This is usually represented as a QE spectrum or graph.
What is FOV and the key factors affect FOV?
FOV stands for Field of View. It refers to the extent of the observable world that is seen at any given moment. In the context of photography or imaging, the field of view is determined by the camera's lens and sensor. It is often measured in degrees (for angular field of view) or meters at a specific distance (for linear field of view).
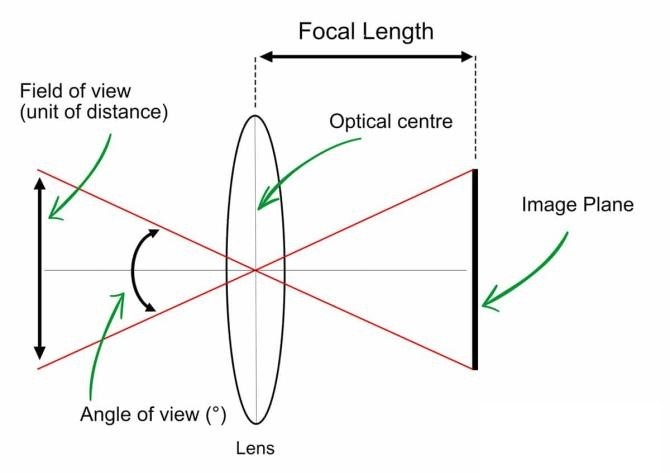
Several factors can affect the field of view:
1. Focal Length: Focal length is the distance between the lens and the image sensor when the subject is in focus. Lenses with shorter focal lengths have wider fields of view, while lenses with longer focal lengths have narrower fields of view. For example, a wide-angle lens (like an 18mm lens) has a broad field of view, while a telephoto lens (like a 200mm lens) has a narrow field of view.
2. Sensor Size: The size of the camera's sensor also affects the field of view. Larger sensors capture a wider field of view compared to smaller sensors when the same focal length lens is used. This is why different cameras with different sensor sizes will give different fields of view with the same lens.
3. Working Distance: Distance to Subject, the closer you are to the subject, the narrower your field of view will be. The further away you are, the wider your field of view will be.
4. Crop Factor: This is related to the sensor size. Some cameras crop the outer portion of the image, effectively reducing the field of view and increasing the focal length. This is common in so-called APS-C and Micro Four Thirds cameras, which have smaller sensors than full-frame cameras.
What are the Types of camera mounting?
| Mount |
Type |
Maximum Sensor Size |
| C-Mount |
Screw Thread |
22 mm |
| F-Mount |
Bayonet |
44 mm |
| M42 Mount |
Screw Thread |
42 mm |
What does shutter mean in camera, how many types of shutters and their differences?
shutter is a device that controls the exposure time, or the length of time during which light is allowed to hit the sensor to capture an image. It is one of the critical elements in determining a photograph's overall exposure, along with aperture (which controls the amount of light that passes through the lens) and ISO (which affects the sensitivity of the camera's sensor to light).
There are different types of shutters, but the most common types in digital cameras are Mechanical Shutters and Electronic Shutters.
Mechanical Shutter: This is a physical barrier that opens and closes to allow light to reach the sensor. Mechanical shutters come in two types:
1. Focal-plane Shutter: This is the most common type of shutter in digital cameras. It consists of two curtains located in front of the sensor: one that opens to start the exposure and another that closes to end the exposure.
2. Leaf Shutter: This type of shutter is usually located within the lens itself. It works by using a series of overlapping metal blades that open and close to expose the sensor to light. Leaf shutters are common in some medium format cameras and compact cameras.
Electronic Shutter: This is not a physical barrier but a function of the sensor itself. The sensor is turned on to start the exposure and off to end it. Electronic shutters can achieve much faster shutter speeds than mechanical shutters and operate silently, but they may cause distortion with fast-moving subjects or under certain artificial lighting conditions due to the way they read the image from the sensor (a process known as "rolling shutter").
Rolling shutter and global shutter refer to two different methods used by camera sensors to capture an image.
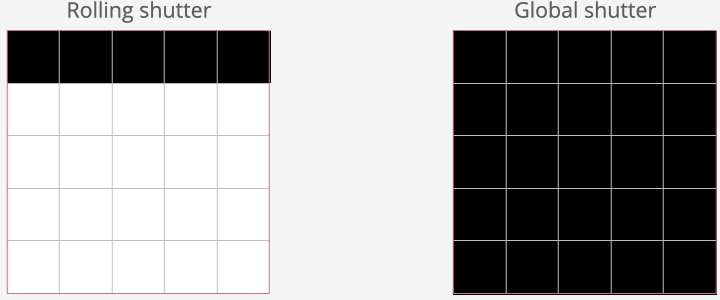
* This is a GIF picture from https://www.e-consystems.com/blog/camera/technology/how-global-shutter-cameras-can-improve-robotic-vision-systems/
1.Rolling Shutter:
In cameras with a rolling shutter, the sensor records the image one row of pixels at a time rather than capturing the entire frame at once. It starts from the top and progresses to the bottom. In other words, not all parts of the image are recorded at exactly the same time, but rather in quick succession.
The rolling shutter effect can lead to distortions when capturing fast-moving objects or during fast camera movements. Objects may appear skewed or warped. This phenomenon is often referred to as the "jello effect" in video recording.
However, rolling shutters are generally less expensive to manufacture and are more common in consumer-level cameras.
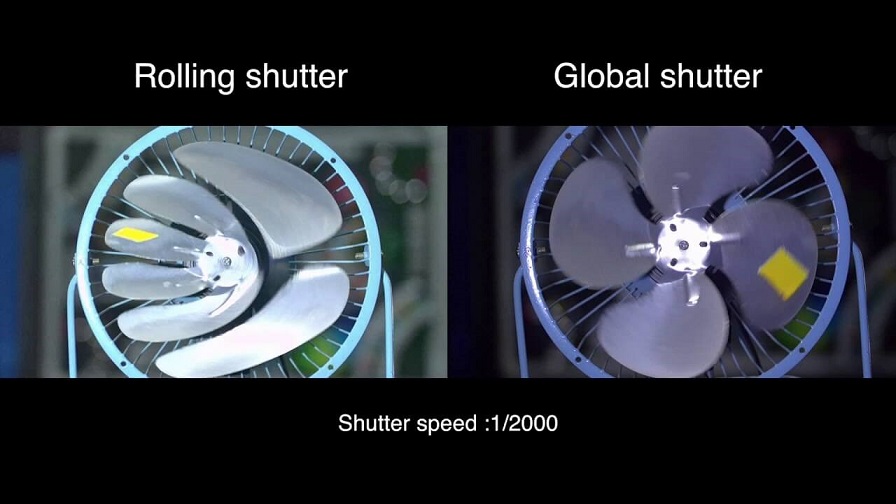
2. Global Shutter:
In cameras with a global shutter, the entire frame is captured at the exact same time. This means every pixel on the sensor starts and ends its exposure at the same time, resulting in a consistent capture of the scene.
Global shutters are extremely beneficial when shooting fast action or when panning the camera quickly, as they don't produce the same distortions or skewing effects as a rolling shutter.
However, cameras with global shutters tend to be more expensive and complex, and often have lower dynamic range or require more power, which is why they are less common in consumer cameras and more frequently found in higher-end or professional video cameras.
What is Digital Gain & Analog Gain?
Digital gain is a process used in digital cameras and other electronic imaging devices to increase the brightness of an image. This is typically done in the digital domain, after the image data has been read from the sensor, hence the term "digital" gain.
The way digital gain works is essentially by multiplying the digital value of each pixel in the image by a certain factor. For example, if a pixel has a value of 100 and the digital gain factor is 2, the resulting pixel value after applying digital gain would be 200.
However, while digital gain can make an image appear brighter, it does not increase the actual amount of detail or information captured by the sensor. Because of this, using digital gain can result in a decrease in image quality. This is typically seen as increased noise (random variations in brightness or color information) and reduced dynamic range (the range of light to dark tones the sensor can capture).
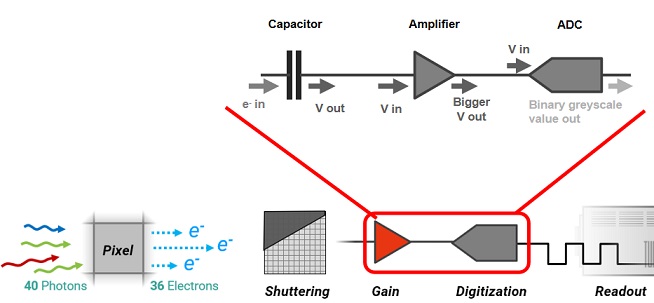
In contrast, "analog gain" (or ISO gain) involves amplifying the actual signal from the sensor before it is converted to a digital value. This can potentially capture more detail in low-light conditions, but it can also increase noise.
In general, it's usually best to capture as much light as possible by using a longer exposure or a larger aperture, rather than relying on digital gain, to achieve the best image quality.
Under what scenario cameras need gain:
1. Low-Light Conditions: In situations where the amount of available light is low, gain can help to increase the brightness of the image, making it possible to see details that would otherwise be lost in shadow.
2. High-Speed Photography: When capturing fast-moving subjects, it's necessary to use a fast shutter speed to freeze the motion. However, a fast shutter speed lets in less light, which can result in underexposed images. Gain can be used to compensate for this.
3. Small Aperture: Sometimes, it might be necessary to use a small aperture to achieve a greater depth of field. A small aperture lets in less light, which can result in a darker image. Gain can help to increase the brightness in this scenario.
What is grayscale (ADU), bit number (Depth)?
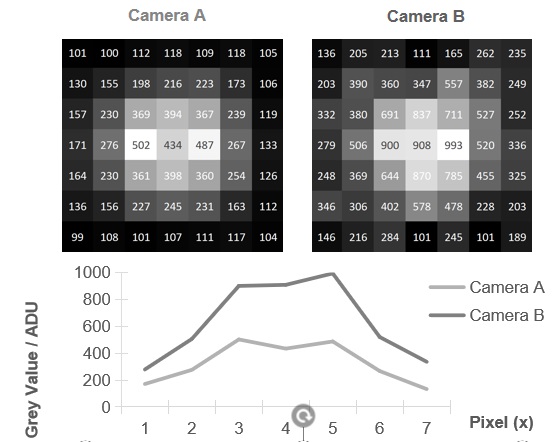
In digital imaging, grayscale is a range of monochromatic shades from black to white. So, a grayscale image is one in which the value of each pixel is a single sample, representing only an amount of light; that is, it carries only intensity information.
ADU stands for Analog-to-Digital Units. This is a unit of measure used in the field of digital imaging, specifically in analog-to-digital conversion. It represents the grayscale values as determined by the Analog-to-Digital Converter (ADC) in a digital camera or other imaging device.
In a grayscale image, each pixel is typically represented by an 8-bit value, which means there are 256 (from 0 to 255) possible shades of gray that can be represented, where 0 represents black and 255 represents white.
When light hits the sensor of a digital camera, it is converted into an electric charge. This charge is then converted into a voltage, amplified, and finally turned into a digital value by the ADC. The resulting grayscale value in ADUs represents the intensity of light that was recorded by the sensor.
The "bit number" or "bit depth" in digital imaging refers to the number of bits of data stored for each pixel. The bit depth determines the number of possible values or levels of intensity that can be represented.
In general, the more bits you have, the more potential for detail or precision you have. Here's how this plays out in different bit depths:
1-bit: In a 1-bit depth system (binary), each pixel or sample can only be one of two values, often representing black and white, or on and off in the case of digital signals. This is the simplest and least detailed level of representation.
8-bit: An 8-bit depth allows for 256 (2^8) different possible values. In the case of grayscale images, this allows for 256 different shades of gray. For color images, this usually means 256 levels for each color channel (red, green, blue), which translates to over 16.7 million possible colors (256 x 256 x 256).
16-bit: A 16-bit depth provides 65,536 (2^16) possible values. This extra precision is especially beneficial in scientific imaging, professional photography, and digital audio, where subtle differences can be critical. For color images, 16 bits are usually divided among the color channels, resulting in a greater color precision.
24-bit and 32-bit: These bit depths are commonly used in digital audio. A 24-bit or 32-bit audio sample has more dynamic range and precision than 16-bit audio, leading to higher audio fidelity.
As the bit depth increases, so does the file size and the processing power needed to handle the data. This is why, for many consumer applications, 8-bit or 16-bit depths are often sufficient. However, for professional or scientific applications where precision and detail are critical, higher bit depths may be necessary.
What is signal to noise Ratio (SNR)?
In digital imaging, the term "noise ratio" often refers to the Signal-to-Noise Ratio (SNR), which is a measure of signal strength relative to the background noise. It's one of the key metrics used to assess the image quality produced by a camera sensor.
Signal: refers to the actual image data, the valuable information you're trying to capture. In terms of a photograph, the signal is the light that forms the picture.
Noise: refers to random variation or "graininess" that's not part of the actual image. It can be introduced through various sources such as electrical and thermal fluctuations in the camera's sensor, or from low light conditions where the camera struggles to distinguish the true signal.
The Signal-to-Noise Ratio is usually expressed in decibels (dB). A higher SNR means that the signal is stronger than the noise, which generally results in a cleaner, clearer image. Conversely, a lower SNR means the noise level is closer to the signal level, which can result in a grainy or "noisy" image.
In an ideal world, we'd want the SNR to be as high as possible, but in reality, there's always a trade-off. As you increase the sensitivity of the sensor (such as increasing the ISO level), you amplify both the signal and the noise, which can lower the SNR.
So, a key challenge in digital camera design is to maximize the SNR under a range of different lighting conditions. This is achieved through a combination of sensor design, image processing algorithms, and other camera technologies.
 |
Read Noise
Limits Low Light Imaging
|
What are the different types of noise that can affect an image?
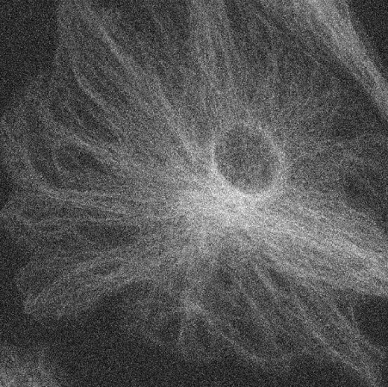
1. Photon or Shot Noise: This type of noise is inherent in the image capture process and is caused by the statistical variation in the number of photons captured by the sensor. Because light is composed of discrete photons, and because the number of photons that reach the sensor will naturally vary, there is always some level of photon noise present in an image. It's more noticeable in low light conditions and can't be eliminated, as it's a fundamental aspect of the physics of light.
2. Read Noise: This is electronic noise that originates from the process of reading the signal off the sensor. Each time an image is captured, the sensor and the camera's electronics introduce a small amount of noise into the signal. Read noise is more noticeable in dark areas of an image and in longer exposures.
When is readout noise significant?
- Only when you’re working with low light imaging applications – i.e., less than 100-200 photons per pixel.
- Low readout noise also contributes to high dynamic range (HDR).
- For most live-cell imaging applications, 0.5e- readout noise vs 3e- readout noise will make less of a contribution than increased QE or Pixel Size.
- Most applications work with significantly higher signals than 100-200 photons per pixel!
3. Thermal Noise: This noise is due to the thermal excitation of electrons within the camera's sensor and other electronics. It becomes more noticeable with longer exposures and higher temperatures. For this reason, some high-end cameras and scientific imaging devices use cooling systems to reduce thermal noise.
 |
Dark Current Noise
temperature & exposure-time dependent
|
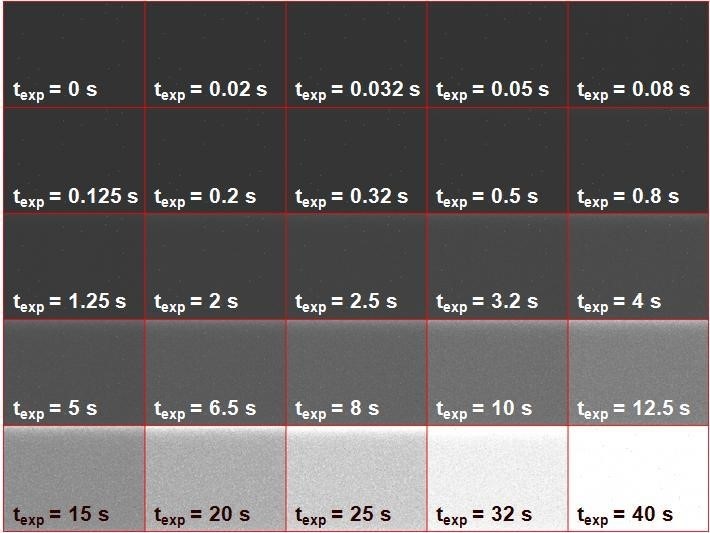
4. Dark current refers to the electrical current that flows through a photosensitive device, such as an image sensor or a photodiode, even when no light is present or when the device is in complete darkness. It is caused by the random thermal excitation of electrons within the device, leading to a small amount of charge being generated.
In digital imaging, dark current can have a significant impact on image quality, especially in long-exposure photography or when capturing images in low-light conditions. The dark current manifests as a noise signal, adding unwanted variations to the image and reducing its overall quality.
Dark current is temperature-dependent. As the temperature increases, more electrons are thermally excited, leading to a higher dark current level. Cooling the sensor or the device can help reduce dark current and minimize its impact on the image.
Dark current accumulates over time, so longer exposure times increase the contribution of dark current to the overall image noise. This is why long-exposure photography can be particularly susceptible to dark current noise, resulting in visible artifacts or a grainy appearance in the image.
5. Quantization Noise: This noise is introduced during the analog-to-digital conversion process. It's the result of small inaccuracies in converting the continuous range of analog signals into discrete digital values.
6. Fixed-Pattern Noise: This is noise that takes on a specific pattern that does not change from image to image, typically resulting from imperfections in the sensor. For example, some pixels may be inherently more sensitive than others. This type of noise can often be reduced through calibration techniques.